Showing posts with label PJ sports. Show all posts
Showing posts with label PJ sports. Show all posts
Wednesday, March 19, 2008
Lady Cardinals post-season run
Photos Mark M. Hancock / © The Beaumont Enterprise
Soundstripe composed by Mark M. Hancock / DFWmark.com
Lamar University's Lady Cardinals advanced into the semi-final and championship games of the Southland Conference Tournament against Corpus Christi at the Merrell Center in Katy. Their post-season run ended when they lost the championship game to UT San Antonio on March 15, 2008.
People in this slideshow include (in order of appearance): Lamar's Nikki Williams (No. 10), Corpus Christi's Shaye Montgomery, Lamar head coach Larry Tidwell, Lamar's Tamara Abalde (No. 22), Corpus Christi's Adrienne Scott (No. 44), Lamar's Brittney Williams (No. 34), Millie Hoyal of Vidor, Lamar's Aida Bakhos (No. 13), Lamar's Trashanna Smith (No. 25), UT San Antonio's Monica Gibbs (No. 33), UT San Antonio's Amanda Foster (No. 24), UT San Antonio's Amber Gregg (No. 10), Lamar’s Emily Spickler (No. 4), and Ashley Crawford (No. 12).


Wednesday, November 07, 2007
Media boycotts Australian cricket

Mark M. Hancock / © The Beaumont Enterprise
Crickets fry in a skillet during Free Family Arts Day at the Art Museum of Southeast Texas in Beaumont on Saturday, Oct. 27, 2007.
Major media outlets including Associated Press (AP), Reuters, Agence France-Press (AFP) and many Australian newspapers are joining forces to boycott a cricket Test match between Australia and Sri Lanka. Cricket Australia (CA) is attempting to manage rights and demand payment for media access credentials.
For once, the organizations are doing this the right way. They won't cover any press conferences or any other organization-staged events. Appropriately, the history books won't include this event.
This is quite possibly the single worst attempt at a rights grab I've seen. Not only does this organization want to be paid for images shot by various media professionals, they want to claim intellectual property rights. I suppose they'd also like the managing editors to carry their babies, but they can't figure out how to legally word it yet.
If the CA holds a press conference in the woods ... who cares?
Cricket means as much to Americans as the Super Bowl means folks in Tajikistan, but both are important to some sports fans. With this said, it's basically meaningless to cover either event without use.
There won't be any less newspapers sold. There might be a few less clicks on news sites, but the entire news industry isn't going to collapse because we didn't cover a freaking cricket match.
If anything, those same shooters can put their talent and skill to work with fine local atheletes, who don't typically get enough page space. The latter could sell one additional paper and generate a few clicks as well.
Although it's not discussed often (if ever), at the heart of this mess is the core mission of this job. PJs and sports shooters get in this low-paying biz to have our work seen by others. If we must PAY to have our work stolen by a sports management company, it's not worth it.
PJs make images because we love the work itself. If others are greedy enough to want to steal our labor and limit where and when we can display our work, it's nothing I want to shoot. There's plenty of other stories that need my attention.
There is no acceptable access contract. We don't need managed sports or entertainment to make images. We make the images.
If self-serving, greedy people would stop trying to limit who sees the images we make, it would be a much better world.
Enough for now,
Monday, April 10, 2006
How to shoot baseball and softball

Mark M. Hancock / © The Beaumont Enterprise
Keri Burnside (No. 11, right) of the Stockton, Calif. Runnin' Rebels slides safely across home plate as Beaumont Blast's Amanda Hill (No. 12, left) moves for the tag during the American Fastpitch Association national softball tournament at Ford Park in Beaumont on Saturday, July 30, 2005.
Baseball and softball are very similar games. I'll talk generally about the games in terms of baseball. However, I've included a section about softball to explain the variances.
Baseball is a visual feast or famine game. If the pitcher is really great, there's nothing to shoot. If both teams are better at offence than defense, a PJ winds through a lot of frames rapidly.
By PJ standards, these are slow games. The majority of most games are as visually exciting as watching grass grow. However, there are brief moments of amazing athletic ability and severe collisions. Because this window is so tight (and the extremely-hard, fast-moving balls [and bats] seem to have PJ magnets in them), it's important to pay close attention during the entire game. Otherwise the PJ misses the shot and/or wakes up in the hospital covered in blood.
Why concentrate on baseball?
A significant reason to get good at shooting baseball is the frequency of the game. During a normal baseball season, many games are played. A quality baseball shooter has gigs from March through October.
Additionally, because baseball isn't as hard on the players' bodies as heavy contact sports, back-to-back games (called double headers) are common. Likewise, some pro teams may have three or four home games in a given week.
Even at smaller papers, Tuesday means high school softball, Friday is high school baseball and Saturday is high school or college baseball and/or softball. If a freelancer does the math, they'd understand the importance of getting really good at this particular sport.
Before the game
Access
First and foremost, make sure to have all access and parking passes before the event for major league and international baseball games. If the passes aren't already in hand, call around before game day to find the person who has them. If the promoter promises to have them at the game, insist on a contact name and cell phone number as well as a back-up person and cell number.
The people at the ticket booth and security don't know what they haven't been told, so their first impulse is to deny access. Having a name and cell number guarantees access - even if the contact wrecks on the way to the game.
To save a lot of walking with heavy equipment, know where media parking and the media gate are located.
For games in small stadiums, park far away from the field. Those foul balls go somewhere. Make sure it doesn't go through a PJ's windshield.
Safety precautions
PJs must keep their eyes open at all times when covering these games. Although ball control and accuracy tends to increase as speeds increase, someone can always miss. It's called an error during the game. It's called a concussion or broken ankle during the warm-up period before the game.
In the pros, imagine any part of your body being hit by a 100mph rock. If a bat breaks, it's a 100mph wooden stake. Softballs hurt less, but they leave a serious sting wherever they hit.
If a PJ is concerned, there is no shame to wear a batting helmet while covering a game. If not, at least wear a hat. Likewise, it's logical to use a monopod while shooting with long glass, but make sure it stays between your knees. It's not much of a hiding place, but it may deflect the ball enough to break a leg instead of ...
For daytime games, take at least one bottle of water. In addition to aforementioned safety hazards, noontime sun, humidity and a windless field are a dangerous combination. Don't dehydrate, cause a ruckus and make it even more difficult for other PJs in the future.
Get rosters
Don't shoot a single frame of a low level game until you have a roster with first name, last name and number. If a team is losing horribly after a few innings, they may refuse names.
If the roster is hand written, have a coach or player check it for spelling accuracy. Even if it's from the team's official Web site, it's good to ask the coach to verify the names are spelled correctly and numbers are accurate.
Typically, full rosters are available in the media rooms at pro games. They are located in the press box at minor league and college games. They are at the gate for high school playoff games. They are in the press box for most high school games with announcers. The coach has them for other games. They're in the heads of the coaches for little league games.
Work the fans
Arrive early and work the parking lot for anything interesting. Look for tailgate parties, face painting, herds of pee-wee league teams or vendors. Shoot folks with the giveaway items at pro games (Bobbleheads, mini bats, etc.).
Also work the crowd in the stands for painted faces, costumes or anything else interesting. Don't forget to take a look at the vendors for additional images (freelancers need to give them biz cards to make after-market sales).
Before most college and pro games, a dignitary of some sort throws out the first ball. Shoot it for the archive and get proper cutline info also get the name and some shots of whomever sings the national anthem (both singers if it's an international game).
At high school and lower games, get some CYA shots of the players warming up. In particular, get some decent shots of the outfielders with the longest glass you've got.
At minor league games, the players normally sign autographs and have mild interactions with fans. The easy way to work it is either with a long lens from the side where the fans blend together and the player is isolated. Otherwise, shoot with a wide angle lens from behind the player to show the faces of the fans. The point is to easily identify the player while avoiding the need to identify every fan getting autographs. However, if some cool interaction happens, work it and get names.
Many pro teams typically have mascots as well. Get some shots of the mascots in the beginning of the season. Get the mascot's official name and the name of the person inside the costume.
At college level and below, if the PJ is there early enough, introduce yourself to the umpire(s) and get their names and hometowns. Of particular importance is the home plate ump. Sometimes the umpires refuse their names (due to overzealous parents). It's not a big deal. Just list the person as "umpire" in the cutlines where the unnamed umpire appears.
When the players are introduced, they normally line up along the first and third baselines. Get shots of each team (shoot four or five players wide). This helps match shoes, hair and body type with jersey numbers for cutline identification later. Note where the front numbers are located for follow shots during the game. Some college teams and many lower level teams have no front numbers. It's important to note this before the game.
Where to locate
Please take a look at a standard baseball diamond to understand the locations.
Now let's consider the best places for PJs to locate. Obviously, sun direction and the umpires play a huge role in where PJs finally end up, but these suggestions are almost guaranteed for a little league game.
Each level of play has different access rules. Typically, at pro games, PJs get to cover from one to four pits located on both sides of the dugout near the infield. Different shooters prefer different locations. However, make sure to be in one of them before the game starts. Otherwise, no movement is allowed until the half-inning exchange.
For lower level games, the best location for the top of the 1st inning is in the stands behind the backstop to get the pitcher. Next, move to the 1st base side, directly to the side of the pitcher and in front of the dugout or behind the on-deck circle. From here, PJs can shoot the pitcher, shortstop, all three bases and home plate.
If someone makes it to 1st, line up on the base for dives back. The alternative is to align the base with the pitcher for a sideview of the dive, which also includes the pitcher. However, note that if the 1st baseman misses the ball while the mirror is up on the SLR camera.... well, just expect some lens repair costs, a nasty bruise and possible concussion.
Once PJs have enough safe shots, do the same from the 3rd base side. This allows for 400mm views of the 1st base dive, better shots of 2nd base, 200mm slides into third and catcher-oriented collisions at home plate.
At coach- or machine- pitched little league games, PJs are able to move around the field as well. Most parents are happy to see the newspaper and are willing to suspend this rule to get their kids in the newspaper. Don't forget to look for very young kids drawing in the dirt, facing the wrong direction or doing the things which make kids cute.
Precision timing
Although speed and timing are factors in almost all sports, it's paramount in baseball and softball. Balls often travel at nearly 100mph. Bats swing at similar speeds. To stop both objects traveling in opposite directions requires PJs to know exactly which 2000th of a second to shoot.
It's normal to shoot with long glass at very high speeds when covering baseball. This stops the ball, the bat and keeps players sharp although they may be moving in more than one direction simultaneously.
Even though it's nice to say this should be shot at 1/2000, we must understand exactly which 1/2000th of a second to choose. We can't simply wind through a play and expect to nail it. Instead, we must nail it with the first shot at precisely the right moment and wind through the remainder of the play.
To get the right fraction of a second, we must factor in shutter lag. It's not bad on pro dit cameras, but it's still enough to cause problems. Typically anticipating the play and keeping both eyes open is enough.
I'm beating this dead horse because we must understand the best digital pro cameras only yield about four frames per second. At 1/2000th, it means the PJ absolutely misses 1,996 fractions of the same second. The difference between frames is enough for the ball to vanish from the frame. So, pick only the perfect 1/2000th of a second as the first shot in a series - then wind through some extra frames.
Additionally, since the ball is small and typically completely engulfed in a ball glove, it's critical to shoot before the glove closes around the ball. This way, the ball can be seen inside the glove or slightly separated from the glove. Likewise, PJs are much more likely to get a sharp ball at the end of the pitch rather than shortly after it's hit by a bat (momentum and inertia).
What's the difference
Softball is slightly different than baseball. Primarily, baseballs hurt a lot more. :-)
Moreover, softball fields are smaller. Both the distances between bases and the distance to the wall are less. A softball game can be shot with a 200 or 300mm lens.
The ball is pitched underhanded. The ball is obviously larger and often bright yellow.
Softball doesn't allow leading off the base like baseball. However, once the ball leaves the pitcher's hand, they can capitalize on errors to steal a base.
First base is wider to allow the runner to pass without a collision.
Some games may have a "five-run rule." This means a team's at bat ends once they score five runs during the inning. This rule keeps mis-matched games from lasting forever and ending with a 250-1 score.
Another mismatch control seen in softball tournaments is timed games. The game is played as normal (no five-run rule), but the ump notifies the teams at the end of a specified time (it varies) and the game finishes after this particular full inning.
Shoot the game
For simplicity, we only have one local team playing this game. For new PJs, editors only want shots with a home-team focus unless otherwise stated (wire piggy-backs). It doesn't matter how great the visitors are, focus on the home team. Better images show both teams' faces, but focus on the home team's eyes first.
Like other contact sports, PJs want to capture conflict between the players of opposing teams. Shots with only the home team could be made during practice. The importance of shooting the game is to show the battle between two teams.
Like most other sports, watch the players not the ball. If a PJ tracks the ball, all the players can blur (not in a good way). However, understand the ball must be in almost every shot, and it should also be very close to the players to be successful. Timing is critical in this sport (measured in 1000ths of a second) and PJs must be comfortable with the shutter lag of their particular cameras to nail the plays.
It's really important to shoot baseball and softball with both eyes open. Watch the game and what's in the viewfinder at the same time. Again, timing is critical because the ball moves so fast and changes hands often, so PJs need to watch the ball outside of the frame to shoot when it precisely nears a player.
PJs who don't do a lot of this long-lens, double-eye stuff need to practice on a flock of birds or some other randomly occurring event to get accustomed to seeing long through one eye and normal through another.
Like football and soccer, it's best to shoot from one knee (lower level in pit for pro games) because the players are close to the ground during most major plays. This is how PJs get tight shots of the players' faces as they dive back to first base or makes a tag. Additionally, the PJ becomes a smaller baseball magnet closer to the ground.
Deadlines
Know the deadline to deliver game images. Typically, a PJ should have a "winner" shot and a "loser" shot as well as the safe shots and at least one good action shot of the same team by the end of the 3rd inning. This is normally about the time most deadlines hit.
At pro and college games, transmit the two option shots as well as any good action shots. Then, shoot the remainder of the game for file.
Safe shots
Since most folks covering Major League Baseball are familiar with the game, I'm going to drop this down to college and lower level games. These fields typically don't have pits and place PJs slightly closer to the field of play than MLB and minor league games.
Get the starting pitcher
If the entire town catches on fire, but the PJ has a shot of the starting pitcher throwing a ball, s/he can leave and still be OK for the paper. Most baseball stories are about how well or poorly the pitcher did.
Often, the PJ should start shooting in the stands directly behind the batter. This is a direct shot at the pitcher. The movement of the pitcher is less severe from this angle. During daylight games, the grip on the ball can be captured at f/2.8 if the PJ has great timing.
The reason I suggest often in the previous paragraph is due to a recent trend. For the last few years, umps have gotten wired about where PJs stand. Some umps are really cool and if the PJ gets killed, it's his/her own fault. Others want to protect us from ourselves.
Unfortunately, the ump gets to decide this. So, play along with it. If it gets too restrictive, bring it up with the coaches later and they'll normally work to keep that particular ump from officiating their games so their kids get in the paper.
With this stated, if the PJ is stuck on the sides, the most important shot is still of the starting pitcher, but it becomes more important to see if the starting pitcher is right or left handed. The PJ wants to be on the opposite side to be able to see the pitchers face as the ball is released off their fingers.
In other words, for a right-handed pitcher, PJs should be on the 1st base side and on 3rd for a lefty.
A 400mm on a dit camera is normally fine for the pitcher. If the PJ has a prime location during a day game, use a doubler on a 300 or 400mm for a nice, tight shot of the pitcher. Then, the PJ is super covered.
Infield players
With a 400mm, shoot the shortstop from the 1st base line. A great shortstop makes the pitcher seem perfect. The shortstop is located between 2nd and 3rd base. S/he gets most fast right-handed ground balls and line drives, then throws to 1st base. In other words, if the shortstop is good enough, nobody makes it to 1st base.
The 2nd baseman holds the same importance when a left-handed batter is at the plate. The 2nd baseman plays between 2nd and 1st base if nobody is on those bases.
The 1st baseman is actually one of the key players in the game because the whole point of the game is to keep players from making it to first base. Consequently, the first base player must catch many balls throughout the game. The better ones are capable of full splits to make a play.
Unless the ball goes deep into the outfield, the 1st baseman will be the end point for the ball after a hit. As a result, the 1st baseman tends to leave a foot on the bag at all times during play. To make sure focus is sharp, either set the camera focus to manual or single servo and lock onto the first base.
It's important to shoot the ball as close to the 1st baseman's open glove as possible - preferably with the opposing team's player in the frame as well.
The 3rd baseman picks up several groundballs if the pitcher throws off-speed pitches. Otherwise they are the last chance to stop a speedy runner before the runner could possibly score.
Catcher
Although the catcher is the 2nd most important player on the team, don't spend too much time on the catcher until a play at home is expected. The most important issue near the beginning of the game is to make sure to get a clear shot of the catcher's number (front number is covered by a chest plate) for later identification.
Outfield
Like the shortstop, great outfielders can keep the pitcher's honor. As long as they pull balls out of the air, nobody gets to 1st base. Make sure and have a decent shot of the key infielders before concentrating on the outfield. If someone is on base, don't miss a play at the plate to get the outfielders.
Expect poor light
Although many games are played during the day and major league games are played in well-lit ballparks, some high school games are played on fields with so little light it's hard to see and harder to photograph. If possible, avoid flash, but be ready to use flash if necessary (preferably on a flash bracket to minimize red-eye).
Yes, the ump might come unglued, but they may not mind if the light is obviously too poor to shoot (it often is). Unlike other sports where flash isn't a huge issue, it's a potential hazard in baseball. So, use it sparingly and make sure you have the shot (focus, timing, action) before you light up the play.
Average shots
Work shots for publication first. Often these won't be published because they're a stepped-up version of safe shots. Each sport has its own variation of average shots (think a "C" on a college exam). These images might be great, but PJs are merely covering their rumps.
Get the coach
Coaches are positioned in the coaches boxes at 1st and 3rd base while their team is at bat. When their team is on the field, they're in the dugout.
The coaches use non-verbal signals to tell batters and runners what to do. These can often make entertaining visuals at lower level games when players aren't entirely familiar with the codes and the coaches show frustration.
When a player is on base, the coach directs them to move forward, dive back, steal or hold. After several pick off attempts, it's safe to focus on the coach to see her/his instructions to players (particularly after a batter hits a double).
Get the batter
These are the ultimate safe shot. Admittedly, the really good shots come from the pro level games because they still use wooden bats (which sometimes break). However, even in lower level games a batter gets hit by the ball and displays interesting facial expressions.
Otherwise, it's a nice exercise in timing to try to get the ball as it makes connection with the bat or an interesting strike (miss). This can be done with a 400mm from the far end of the dugout or a 200mm from behind the on-deck circle. It can be shot horizontally if loose or vertically if tight (batters tend to swing slightly down to lift the ball off the bat).
To get these, set focus on the batter's face. Then watch the ball as it's delivered. It takes some practice, but eventually PJs learn the perfect location to counter the shutter lag (typically as the ball leaves the grass).
Get the players
Always focus on the player's eyes instead of the ball. Each team has 9 players on the field plus a designated hitter/runner in some leagues. Try to get one clear shot of each player controlling the ball or making some play at a base. These can be used throughout the season. Tight face shots will work if nothing much is happening.
PJs want the player facing the camera and in good light if possible. By working both the 1st and 3rd baselines, PJs should have a shot of every batter after three innings (right-handers from 1st and left-handers from 3rd.
Get meetings
After some bad pitches or an error, the coach, pitcher or catcher might stop the game to talk with another player. Get these meetings. Although it's nothing most of the time, it's better than a photo of the player's back as they get pulled from the game. On a rare instance, there might be some serious emotion happening and those make great shots.
Taking this one step further, get any confrontations of the umps and the coaches or players. When a coach or manager gets in the face of an ump, emotions can get really hot. The exchange can become so hot that an ump might eject a coach. This will be a water cooler story for the next few days, so this shot is important for follow-up stories - even if it's not the deadline shot.
Good shots
Now it becomes important to understand the game. Roughly, teams try to run players from base to base until they get to home plate to score. Some teams steal bases because they have fast players and count on the opponent to make errors (or don't trust their batters much). Other teams play fairly close to the bases and prefer batters to make consistent singles to load up the bases.
In the first case, the plays are at the bases. In the second case, the plays are in the outfield.
Base plays
In baseball, once a player is on base, they can steal an additional base. This leads to a tension between the base runner and the pitcher. If the runner torments the pitcher enough, the pitcher makes mistakes and might walk a batter or balk. Either way, it's to the running team's advantage to irritate the pitcher.
Meanwhile, it's to the pitcher's advantage to pick off a runner by throwing them out at 1st base or another base if they steal.
To get this shot, focus on the base where the runner would return. Until the ball is thrown or the runner commits to run, this is where the action will take place. If the player tries to steal, immediately swing to the advancing base, focus and be ready to shoot.
Outfield plays
Teams which load the bases with singles typically hit the ball to drop between the infield and outfield players. To catch these balls, the outfielders will typically sprint toward the ball and may leap to make the catch.
With a 400mm or longer lens, focus on the running outfielder in continuous focus mode (or manually) and track them as they move. PJs are hoping for a diving catch. Ideally, this will happen mid-air. Wind through some extra frames in case the outfielder misses the ball or drops the ball on impact.
Homerun congratulations
After a home run is hit, the team is allowed to go onto the field to welcome home the running players. Typically a few hugs, jumps or helmet patting takes place. It makes for nice "our team won" shots. If the opposing teams pitcher is particularly good or bad, this is all the PJ might get (because each ball thrown is a homerun or there was only one hit in the entire game).
Dugout emotions
On important or evenly-matched games, watch the home dugout for tension and reactions. These can either be shot wide from inside the dugout area or long from the opposite side of the field.
On finals games, be ready to run. The editors want to see a dejected player in the foreground with the jubilant team celebrating in the background. This means the PJ must circle around the losing players and align the winning team behind them. This lasts about 10 seconds.
In baseball, there tends to be a lifting of a key player followed by a pileup on the key player at the end of significant games.
Experiment
Although we're all trained to get the fast, sharp shots, remember to get a few f/22 panning shots with motion and blur might make interesting results. These are "artsy" shots to show the game's speed and motion. A pan with the player ensures the main torso and head are sharp while the rest is blurred. This shot works particularly well during home run trots.
Don't forget to spend a little time shooting down from the stands or on top of the dugout as well. This gives PJs clean backgrounds behind the players. However, this angle limits PJs to primarily pop flies where the players look up instead of down. The roof of the dugout is a particularly good position for interesting alternative shots.
An interesting shot (although becoming somewhat cliché now) is to zone focus where the ball is the only point of focus as a pitcher delivers the ball. This is shot from behind the batter. A point of focus is determined close to the batter to make the pitcher extremely out of focus when the aperture is set at f/2.8.
The PJ shoots as the ball enters this narrow zone of focus. Although it looks interesting, it's simply a matter of timing the ball to the point of focus. This shot salvages a deadly-boring, low-scoring game.
Excellent shots
These images are either high risk or predictable but rare. If luck and planning are with the PJ, the PJ looks brilliant at the editing desk. These are the "A" grade shots. Again, I stress not to try most of these until some publishable shots are already accomplished.
Home plate collisions
This is "The shot" editors want. The runner has a chance to win the game if s/he can make it to the plate. The armor-clad catcher can save the game by preventing the runner from making it to the plate. Typically, these plays are also close to the umpire to complete the package in one frame.
Although this shot is important from either direction, it tends work best from the 3rd base angle. The catcher is braced for impact and typically has a look of fierce determination on his/her face.
Focus on the catcher's face and wind through the entire collision and aftermath including the ump's call. Expect this to take 10 or more frames.
Squeeze plays
A squeeze play occurs when a runner tries to steal a base or tries to get one more base than s/he should have. If properly executed, the play actually involves five players (one runner and four defenders).
This play often happens between 1st and 2nd base. However, it's particularly dramatic when it happens between 3rd and home plate because it takes a lot of guts to steal home.
PJs want to get a shot where the ball is clearly visible slightly before the actual tag or while the player is in the air after the tag (they normally "tag" the runner hard with the ball).
In continuous focus mode, follow the actions of the runner.
Shoot longer
Break out the longest glass and double or quadruple it. This makes outfield shots easier if PJs can spot the outfielder fast enough. For infield players, it allows the intensity of the play to be captured (although possibly not the play, pitch or hit itself). Because the glass is so long and light is lost with the extensions, it's possible to be too tight and/or have depth-of-field issues. Consequently, monitor focus closely when the lens is this tight. Keep the lead eye in focus at all times.
Unusual angles
If PJs have enough glass (600mm or better with a double or quad extension), shoot from the outfield wall toward the infield or plate. Unless the field has perfect light, this can only be done during daylight games.
Some stadiums allow for nearly overhead views (with long glass), these make interesting shots when light is raking across the field and making long shadows.
Although I don't know what all was involved, I recall a cool shot taken from inside a base with a fiber optic lens. If y'all have the equipment and techno know-how, go for it.
Other alternative ideas
Try layering some images. It's hard to accomplish at f/2.8, but it's entirely possible for daylight games. Shoot from the stands to have the batter in the lower foreground with the pitcher in the upper midground. Work signs, mascots or flags in the background or as foreground frames.
Also try some of the "cool" things. Look around for anything reflective or surreal shots. Look for broken patterns (within repetitious patterns) in the stands or on the field. Try a slow-shutter, double-action zoom as the players watches a homerun ball fly.
Daylight games allow silhouettes and other options. It's up to the PJ's imagination and technical prowess. If time isn't an issue, don't leave the game until absolutely every trick has been attempted.
If PJs have the time during a tournament, experiment with new techniques. A cool shot is a cool shot no matter what the assignment says.
Enough for now,
Tuesday, August 02, 2005
How to shoot soccer (futball)
Before the game
Access
First and foremost, make sure to have all sideline and parking passes before the event for pro and international soccer. If the passes aren't already in hand, call around before game day to find the person who has them. If the promoter promises to have them at the game, insist on a contact name and cell phone number as well as a back-up person and cell number.
The people at the ticket booth and security don't know what they haven't been told, so their first impulse is to deny access. Having a name and cell number guarantees access - even if the contact wrecks on the way to the game.
Work the fans
Arrive early and work the parking lot for anything interesting. Look for tailgate parties, face painting, herds of pee-wee league teams or street vendors.
Also work the crowd in the stands for painted faces, costumes or anything else interesting. Don't forget to take a look at the vendors for additional images (freelancers need to give them biz cards to make after-market sales).
Although it's wise to get team rosters from the Web before arriving, get the official roster from the pressbox before the game begins (there could be changes since the Web version). Also, see if the goalkeepers have jersey numbers. If not, find out which goaltender wears which color – VERY important.
Before most pro games, there is normally some form of entertainment on the field. The entertainment will be directed at the home stands and PJs are allowed on the field during this time. Shoot it for the archive and get proper cutline info.
At high school and lower games, get some CYA shots of the players warming up. In particular, get some decent shots of the goaltender blocking shots during warm up. Shoot from in front and behind the net (behind the net for pro and int'l).
At high level games, the players will normally sign autographs and have mild interactions with fans. The easy way to work it is either with a long lens where the fans blend together and the player is isolated or to shoot from behind the player to show the faces of the fans. The point is to easily identify the player while avoiding the need to identify every fan getting autographs. However, if some cool interaction happens, work it and get names.
When the players are introduced, they normally line up in the middle of the field. Get shots of each team (shoot four or five players wide). This helps match shoes, hair and body type with jersey numbers for cutline identification later. Note where the front numbers are located (shorts, jersey or none) for follow shots during the game.
Each level of play has different rules. Typically, at pro games, PJs get to cover both goal lines and one sideline. At international events, PJs get one sideline and one goal line (forces the PJs to stay for the whole game). Don't ask, but test the limits all around the field to see what security allows. If you are told not to be in a certain area, then there's your limit. Otherwise, work it until someone complains.
Shoot the game
For simplicity, we only have one local team playing this game. For new PJs, editors only want shots with a home-team focus unless otherwise stated (wire piggy-backs). It doesn't matter how great the visitors are, focus on the home team. Better images show both teams' faces, but focus on the home team's eyes first.
Like other contact sports, PJs want to capture conflict between the players of opposing teams. Shots with only the home team could be made during practice. The importance of shooting the game is to show the battle between two teams.
Like most other sports, watch the players not the ball. However, understand the ball MUST be in each shot, and it should also be connected or very close to the players to be successful. If a PJ tracks the ball, all the players can blur (not in a good way).
It's really important to shoot soccer with both eyes open. Watch the game and what is in the viewfinder at the same time. Timing is extremely important because nobody maintains the ball very long, so PJs need to watch the ball outside of the frame to shoot when it as it connects with players.
PJs who don't do a lot of this long-lens, double-eye stuff need to practice on a flock of birds or some other randomly occurring event to get accustomed to seeing long through one eye and tight through another.
Like football, it's best to shoot from one knee because the players will be looking at the ground during most of the game. If PJs want to see the players' faces, it's frequently the only way to get the shot.
Safe shots
Please take a look at a standard soccer field to understand the positions.
Start at the halfway line (50 yard line). Because the game starts in the center circle, get some safe shots and then move past the center circle (to the 40s) for mid-air collisions as they go up to get headers.
With men's games, most of the action is around the 35 yard lines on both ends (the goalie can kick to about the opponent's 35 yard line). Work this zone first for the safe shots. Women's games are normally around the 45 yard line.
Soccer is a low scoring game. The goaltender is the primary reason the score is low. The goaltender is best shot from the sideline even with the penalty box (about the 15 yard line).
Once you have some safe shots, work the goal line. If you have a preferred team, go to the goal line of the opposite team and wait for the action to come to you. When it comes (it takes a long time), it'll be extremely fast, so be ready.
The best position on the goal line is around the outside of the goal box line to about half way between the net and the corner. From there, PJs can see most of the field without the net interfering. Since this is where the players score any goals, it's the place most likely to get "the" shot.
Expect poor light
Soccer is often played in poor light. Although many games are played during the day and high-end soccer games are played in well-lit stadiums, some high school games are played on "B Fields" and are hard to see and harder to photograph. Consequently, be ready to use flash if necessary (preferably on a flash bracket to minimize red-eye).
I mentioned using The Beast to light soccer. It was a rare opportunity. I'll probably do it again some day and would suggest other folks give it a try, but don't expect to have many opportunities because access to the pressbox roof may not exist and the refs could always object.
The one caution I'll give about flash is firing from the sideline toward the goal from the same direction as the ball. If a goaltender misses the ball AND is not very sporting, s/he may complain to the ref. If it looks like both of these factors might come into play (PJs know before the game starts), shoot the goaltender a few times when there is no threat. This gives them a chance to complain before the team's loss is blamed on a PJ.
Average shots
Work shots for publication first. Often these won't be published because they're a stepped-up version of safe shots. Each sport has its own variation of average shots (think a "C" on a college exam). These images might be great, but PJs are merely covering their rumps.
Get the coach
When the ball moves close to one end or the other, coaches start shouting commands to their players. From the 40 yard line, it's an easy shot to get the coach shouting to the players. If the PJ has a long enough lens shoot across the field to get the other coach with players in the foreground (don't use flash for these shots due to the inverse square law of light and red eye caused by light parallax).
Get the players
Always focus on the player's eyes instead of the ball. Each team has 10 players plus a goalkeeper. Try to get one clear shot of each player controlling the ball. These can be used throughout the season. Tight header and chest shots are best. These actions make the player look forward or upward rather than at the ground, but any shot with the player connecting with the ball will do.
PJs want the player facing the camera. Shoot from both sides of the field to get all the players. Even if the shooting areas are restricted, PJs can get missing players during the second half when goals are reversed.
Shoot the defenders from about the 20 yard line as they face outward from the goal. Especially try to get any collisions as the defenders are most likely to have conflicts with the opponents' forward players.
Work throw-ins
After the ball goes out of bounds, a player gets a throw-in from the sideline. Many players come near the sideline to receive the ball. It's also the most likely time to get short-lens images of a header or chest trap. Get one safe shot of the player who throws in the ball, but primarily concentrate on those expected to get the ball (they'll be about 10 to 20 yards into the opposing team's area. The throw-in can even be shot with a wide angle lens if the players are close to the sideline.
Good shots
Now it becomes important to understand the game. Roughly, teams try to get the ball into the opponent's goal and prevent the opponent from doing the same. Some teams have strong, fast forwards while other teams use subtle passes and complex formations to get around defenders. A team may employ multiple strategies to get the opponent off balance and sneak a player into position.
During corner kicks particularly, watch for any of the “star players” outside the goal pack. Often, the play involves the ball being fed around the pack to the star who sneaks toward the goal from the sideline and is fed the ball mid air.
In soccer more than other games, it's critical to have the ball in the frame and near the players. Capture the frame slightly before the players make contact (it's moving slowest then).
Additionally, one or two players on each team tend to score the most points. Know if they are right or left –foot kickers and time your best shot for their power kick. It also dictates which side of the goal the PJ should be positioned. Right-footed players rotate to the left as they make mid-air kicks. The opposite is true with lefties. Since PJs need to see the eyes instead of the back, position appropriately.
Go long for outside
Soccer is obviously a long-lens game. It's common to see 600mm lenses on dits at high-level games. If possible, have a 400mm on one body and a 200mm on a second body for closer action.
Understand longer glass actually means fewer shots because other players block most plays. It's frustrating on deadline, but easier to edit.
Try some super-tight shots along the sidelines for throw-in plays. Although the high-flying action remains in the middle of the field, a sideline shot with a 400mm may capture a face-and-ball shot or (more rare) face-ball-and-opponent's-foot shot.
Sideline emotions
On important or evenly-matched games, watch the home sideline for tension and reactions. From the sideline at about the 40 yard line, watch the teammates on the bench from a kneeling position.
On finals games, be ready to run. The editors want to see a dejected player in the foreground with the jubilant team celebrating in the background. This means the PJ must circle around the losing players and align the winning team behind them. This lasts about 10 seconds.
Experiment
Although we're all trained to get the fast, sharp shots, remember to get a few f/22 panning shots with motion and blur might make interesting results. These are "artsy" shots to show the game's speed and motion. A pan with the player ensures the main torso and head are sharp while the rest is blurred. A pan with the ball ensured everything except the ball is blurred (a useless shot). At f/5.6 or 8, pan with a slow rear synch on a slower iso.
Don't forget to spend a little time shooting down from the stands as well. This gives PJs clean backgrounds behind the players. However, this angle limits PJs to primarily aerial plays (headers, corner kicks, etc.) where the players look up instead of down.
If possible, try shooting from a low angle behind the goal net. Get as close to the net as possible and shoot wide. If all works out, the PJ has a goalie flying through the air either stopping or missing a ball on a clean sky background. It's a very dramatic, but high-risk image (because you may miss something on the field and not have a single shot to show for your trouble).
As a useful alternative, pre-position a camera at the back of the net with a wireless remote trigger. Nobody can claim interference if the camera is pre-positioned. Shoot the game normally, but when the play comes to the goal, shoot with the wireless remote.
If using this method, zone focus on the area the goaltender is likely to be. It's also a good idea to use some gaffers tape to lock the focus ring (a bump could knock the camera out of focus).
Excellent shots
These images are high risk. The likelihood of anything useful is minimal, but if it happens, the PJ looks brilliant at the editing desk. These are the "A" grade shots. Again, I stress not to try these until some publishable shots are already accomplished.
Shoot longer
Break out the longest glass and try to get a mid-air shot in front of the goal. Kneel at the penalty box line and focus only on the star player (if they are known for mid-air and/or bicycle kicks). This may cause the actual goal to be missed, but it's a killer if it works. Because the player may be too close, it's possible to be too tight and/or have depth-of-field issues.
Blind overhead shots
An unusual and somewhat risky shot is an overhead shot. The shot can either be accomplished by mounting a camera on a football goalpost over the net (high school games) or by shooting blind from a monopod.
Mount the camera on a monopod with a long plunger, electronic shutter release cord, or use an infrared or FM remote. Pre-focus and test the camera angles (with digital cameras and a monopod ball head). Then, place the monopod base onto a shoulder and follow action. This approach allows a slightly wider lens (50mm works) to get a looser shot. However, remember the PJ is shooting completely blind and may still get nothing.
Other visual variety
Try layering some images. It's hard to accomplish at f/2.8, but it's entirely possible for daylight games. Shoot from the ground through players' legs or find other foreground elements on the sidelines or stands to add some visual variety. Work signs, mascots or flags in the background or as foreground frames.
Try some shots from high in the stands or even atop the pressbox by doubling the longest glass.
Also try some of the "cool" things. Look around for anything reflective for surreal shots. Try a slow-shutter, double-action zoom as the players dribble the ball.
I shot an ad for a beer manufacturer, and they insisted an entire daylight game to be shot at f/22 on 50iso chrome for the look they wanted. They wanted it to have a feel of speed and fluidity rather than sharpness. I never saw the results because it was for a foreign market, but they were really happy with the results and paid well.
Daylight games allow silhouettes and other options. It's up to the PJ's imagination and technical prowess. If time isn't an issue, don't leave the game until absolutely every trick has been attempted. I've even heard of specialty devices attached to the lens to make multiple ghost exposures of the same players with a rotating lens shade.
If PJs have the time during a tournament, experiment with new techniques. I've never seen these or tried them (yet), but consider making some infrared shots or even shoot through large bags of water (maybe even colored water) for cool distortions. A cool shot is a cool shot no matter what the assignment says.
Enough for now,
Friday, July 29, 2005
Shoot Freestyle Motocross

Eric Farr performs stunts during a practice run for the Freestyle Motocross show at Ford Arena in Beaumont on Friday, July 29, 2005.
Photos by Mark M. Hancock / © The Beaumont Enterprise

Toby Whittington performs stunts during a practice run for the Freestyle Motocross show at Ford Arena in Beaumont on Friday, July 29, 2005.
If this tour comes to your town, shoot it. They are cool (no problems with IDs or access), and they are fun to watch. I shot a media practice session before the first evening. This let me set up my strobes and work the arena from different angles.
If time allows, try to shoot a live show as well. The lighting is better, fans make a better background and they'll do the extremely dangerous stunts for competition.
There is one visual problem. The images can all start to look alike. I shot from all around the arena. Although the riders and the stunts are different, the images all have the same look (vertical). So, if you want to pull a package out of it rather than a front and inside pair, you'll need to work riders on the floor as well as the aerials. Since I knew we would run a pair, I concentrated on the jumps.
Due to the shapes they make, and how high they jump (almost to the ceiling), images like these are best shot at a 65-degree front position with a 400mm lens on a dit from the top of a normal arena (1st tier at major arenas). If shooting available light, a side view with a 200mm or 300mm can mix up the visuals, but my strobe created shadows and a background sign was annoying.
Enough for now,
Friday, May 20, 2005
Shoot sportraits

Mark M. Hancock / © The Beaumont Enterprise
West Brook High School baseball team seniors (from left to right) James Ewing, Jay Bruce, Brandon Castolenia, Pat Ford and Michael Ewing pose for a portrait at Bruins Field in Beaumont on Wednesday, May 18, 2005.
They play a series against Humble for the 5A regional quarterfinals starting on Thursday. The five have played for the varsity team since they were freshmen. They all graduate on Saturday.
There are certain universal facts in this world: The sun will rise in the east and set in the west, everyone eventually dies, and each daily newspaper needs sportraits (Sports portraits).
Most people think of high-action images when they think of becoming a Sports PJ. However, sportraits are equally important because of how sports are reported.
Why do we need sportraits?
Sports is about numbers. Sports reporters present a set of numbers after each game. The numbers describe the game in a comparative manner. Likewise, players of most sports track their numbers throughout their athletic career.
Baseball players know their batting average. Football players know their rushing yards or sack totals. Swimmers and track athletes know their fastest times per event. High-level chess players know how many moves were made to get a win.
Chess? Yes, it's a sport because it involves numbers and a winner/loser equation.
Wait, the Business page is about numbers. How could Sports be the same?
Because both Sports and Business involve money. If it has a numerical conclusion, people can place wagers (or sell short) against the numerical outcome. Chess, for instance, can have odds against the winner or loser based on the players' previous experiences. Odds can also be placed against the number of moves required to win. Obviously, if 50,000 people each bet one dollar on an infinite number of moves, someone will win big by foretelling the exact number of moves (or the house keeps it all).
Numbers aren't visual
Since we've determined Sports is mainly regulated by numbers and the human ability to achieve certain numeric milestones or limits, we realize these numbers don't make great visual content.
In the image above, five baseball players have been on the varsity team for four years each. These are the numbers which separate these players from the other players and break up the team to a reasonable number for the reporter. The numbers are the story peg.
Of these five players, one is a pitcher, one is a catcher, one is the shortstop and two are in the outfield. What are the odds of getting all five in one frame during a specific game? Unlikely to impossible would be my guess.
To accompany a strictly numerical story, photojournalists must round up the various people who represent a given set of numbers and somehow make it look cool and give the readers faces to equate to the numbers. Often, it's the only time most readers see their faces (because of helmets).
Business considerations of sports
For many businesses (including various media), sports are the road to profit. Likewise, huge industries exist to perpetuate this revenue-producing trend. Uniform and equipment manufacturers, athletic trainers, kinesiologists, insurance companies, CPAs, and countless advertisers of beer, chips, etc... all have a vested interest in sports reportage. Additionally, we've already discussed the potential income for professional gamblers as well as the casinos and various other book keepers.
Publisher considerations of Sports
Because of the general business environment, sports are doubly important to publishers. The Sports section not only generates advertising income from related businesses, it also generates circulation from all the parents of young athletes, who have a keen interest in becoming a future hometown hero.
Newspapers cover local high school sports more completely than any other media outlet. Magazines tend to cover collegiate and professional or specialize into specific niche sports. Local television might report the final scores as a list accompanied with 10-second clips from the top two or three games - at a specific time.
Meanwhile, the newspaper creates a document for the atheletes' moms to keep in the scrapbook or stick to the fridge. Dad has one in his office as well. This means at least two newspapers were sold. ;-)
PJ considerations of Sports
Because newspaper publishers value the Sports department and PJs who can deliver compelling images for this department, it's the best opening for young PJs. More importantly, it's regular business for freelancers. Each Tuesday and Friday during the school year, there is something to shoot.
Additionally, Sports is a daily section. They must fill the space with feature stories in advance of upcoming sporting events or because of significant milestones. Most of these stories are about numbers. Sportraits break up the gray on the page and fill the dead spots in a freelancer's schedule.
PJs who know how to shoot various sports as well as make interesting portraits of the players have a much easier time getting initial freelance assignments. Every newspaper in America needs sports PJs for Friday night football in the fall, basketball and soccer in the winter and track, softball and baseball in the spring.
Although staff photographers can handle most of the Sports assignments, during peak times, freelancers are required (or at least hired) at most daily newspapers to get wider coverage and make more readers happy.
The freelancers who can embed themselves into the Sports department are most likely to get sportrait assignments as well.
From there, it's not a big leap to understand that anyone who can catch a guy flying through mid-air at night can handle breaking news. Nor is it difficult to understand how a PJ who's good at sportraits could apply the same skills and knowledge to any other group of people (business, news, lifestyles, etc...). Sports PJs who can light an entire arena should be able to handle most studio assignments as well.
Consequently, any PJs (including part-time and high school PJs) who are trying to break into the industry might want to look at breaking into Sports first. Sports PJs must know how to handle fast action in low light situations as well as how to make interesting sportraits. From there, the rest is easy.
Enough for now,
Sunday, May 15, 2005
Make a digital illustration
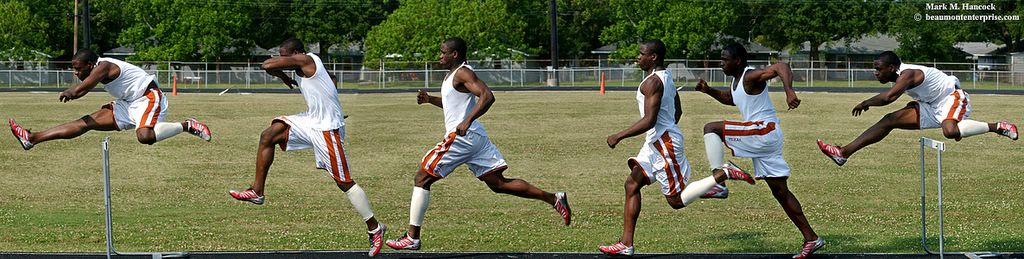
Photo Illustration / Mark M. Hancock / © The Beaumont Enterprise
Port Arthur Memorial High School's Jamaal Charles demonstrates his hurdling stride at the school on Thursday, May 12, 2005. (Click on the image to see a larger version. Click on it for an even larger version.)
This illustration contains six different individual frames of Jamaal Charles. He's an outstanding athlete with great potential. I photographed him two weeks ago when he beat the No. 1 and No. 3 nationally-ranked hurdlers during the Region III Track and Field Championship meet in Humble (near Houston). This weekend, he won the state 5A championship.
As you might guess, this image created a little buzz at the office. Mostly the questions were about how it was done. I'll explain why it was done, then I'll explain how.
But first, let's discuss the role of ethics in photojournalism as it applies to digital manipulation of images. I believe all digitally manipulated images should have the designation "Photo Illustration" to differentiate them from photojournalism. Moving image elements (pixels) without disclosure is the visual equivalent of a lie. It's contrary to photojournalism, which aims to show the truth.
Although there are times when a photo illustration is appropriate, it's best to avoid them and use them only when there is no better way to tell the story.
Why it was done
This assignment was designated as "hot," meaning they needed it quickly for the next day's newspaper. The story idea was to explain the stride and steps a champion hurdler takes from one hurdle to the next.
I could have shot it as a straight sequence to show the stride and distance. However, the track configuration at the time of the shoot would have placed the hurdler's face in shadow instead of light. His skin tone was not reflective enough to handle the two-stop difference. Additionally, a straight sequence would take more space than needed and still wouldn't accomplish the explanation.
My options were:
1. Shoot whatever he did during his normal practice, have his face be lost in the shadow, and possibly not get what I needed anyway - not a good option.
2. Fake the scene (subject manipulation) and have him run into the light several times until I had a good sequence - an IMPOSSIBLE option for my ethics.
3. Make an illustration where I had exactly what I needed while fully disclosing the situation as an illustration with subject and digital manipulation.
Consequently, I committed to a photo illustration to keep on ethical high ground.
Previsualize the final image
To shoot an illustration, the PJ must previsualize the final image. This means the PJ considers the various obstacles and understands what elements are required to accomplish the desired final image. It also makes the PJ consider camera angles, light, background elements and other factors, which could weaken the final image.
For this image, I knew the hurdler must run into the sunlight to have facial details. I also knew I needed enough room to back up and shoot it flat with a longer lens. Furthermore, the background needed to be neutral rather than the high key (which the visitor's stands would have created).
The only area of the track which accomplished the majority of these needs also contained the shadow of one of the light poles. In a perfect world, we would have waited for the shadow to pass from the hurdling area, but we were on a tight timetable.
Ideally, I would've gotten a ladder to use the football field turf as a background, but this was a last-minute decision and no ladder was available. We did what we could with what was available. Sometimes it's how news PJs must do things.
Correct lens angles
This image required me to "shoot it flat." Flat sequences are different than panoramas because the camera moves as well as the subject. In a traditional panorama, the camera is stationary while the subject is either stationary or moving. A panorama thereby creates a curved distortion caused by changing camera angles. I have an admittedly rough example here.
Shoot for the final purpose
Because it was for an illustration, I asked the athlete to run the hurdles four times. I included most step sequences from one hurdle to the next to show the distance traveled, the stride and the number of steps involved.
The second step is missing because it would have crowded three images into an already tight portion of the image.
The images were shot with a 200mm lens from three different locations along a fixed path (two frames per position). This set the background at the appropriate angle. I can't overemphasize the importance of shooting the right image angles to create the final image.
How the digital image was done
The remaining steps are done in PhotoShop. When processing the images, it's best to handle the whole batch in its original files before color correction. Then, the color corrections are consistent throughout the whole image.
Set the canvas
First, open the base image in PhotoShop. This sets the image to the extreme right or left of the final image. I chose the right-hand image because he was running to the left.
Next, choose Image and then Canvas Size. A pop up window appears. Choose the Anchor quadrant from the 10 options to set the base location. Then increase the height or width to slightly more than expected for the final image's size. Then choose OK. This increases the canvas size to the new dimensions and includes the base image.
Save often
Throughout the process, much of the computer's random access memory (RAM) is used. The likelihood of a computer crash is good. Consequently, folks should Save their work after each completed step. This creates much less stress when the computer does eventually crash.
Once layers are introduced in the next step, the image suffix converts from a .jpg (joint photographic expert group) to .psd (PhotoShop Document). The file size also dramatically increases. The advantage of this change is the image doesn't lose information on each additional Save.
The .jpg protocol compresses the file upon each Save and ultimately degrades the image. However, once the image is completely assembled, it's best to Flatten the layers and Save the final document as a .jpg image to compress the overall image for storage.
Working with Layers
Anytime more than one image, text or graphic element is introduced into a PhotoShop image, a new Layer is created. On extremely complex images, it's best to choose Layer and Flatten Image at each major project point to cut down the size of the total PhotoShop image.
While working with layers, it's possible to become confused because all layers appear simultaneously as a two-dimensional image on the screen. To distinguish between layers, choose Window and then Layers to see the set of options. As each layer is chosen from the list, it moves forward in the master image. This doesn't mean it appeared this way when flattened. It only designates which layer is currently active.
After several attempts, it becomes easier to learn the layering patterns and how to use them appropriately without confusion.
Place a second image
Next, open the second image in the series. Select all and copy the image. Paste the image onto the original image. It should appear in the middle of the canvas. Use the Movement tool (on the toolbar it looks like arrows pointing in four directions) to set the image where it belongs according to all image elements.
If the image is "simple," the image elements align near the edges with a slight overlap to allow placement. If the image is complex - such as this one - locate guide points (landmarks) within the image to determine what must be covered or revealed in either the forward or back image layers.
Once the guide points are determined, choose Window and History and delete everything from the last Paste command. Save.
Paste options
Now it gets tricky to decide whether to layer the top image over the bottom, the bottom over the top or a combination of both. Often the primary subject and background determine needs.
Using the Lasso tool, select the area to remain forward in the original image. Then, select the remainder of the original image area(s) to keep. The remaining portion of the image(s) could be overwritten (depends on the incoming image).
Because the selected area is the area we want to protect, we must choose Select and then Inverse. This actually chooses all remaining portions of the image and canvas. Now, choose Edit and Paste Into options to place the new image or graphic element. It must be moved into position, but it slides behind the originally selected areas.
On the image to be introduced to the master file, use the lasso tool to select areas to be introduced to the master file. With this illustration, I selected the whole image and subtracted the areas I didn't want to overwrite. The same effect is accomplished either way.
Once the area is selected, Copy the area. Change back to the master image and Paste the copied area. Move it into position. The copied area has the shape selected in the first image. It moves over the existing image(s) and becomes the top layer.
Continue the process
Continue the copy and pasting process until the images fill the blank canvas area. If additional canvas is needed, simply increase the canvas size in the required direction(s).
Finishing touches
Once all the pieces are assembled into the master document, Flatten the image. Save the image.
It'll probably have a ragged edge. Use the Crop tool and crop off the ragged edges to make the image appear complete. Then color correct, sharpen and adjust as needed.
Once the image is absolutely completed, convert it to a .jpg and Save the final image for storage.
Enough for now,
Saturday, March 19, 2005
Behold "The Beast"
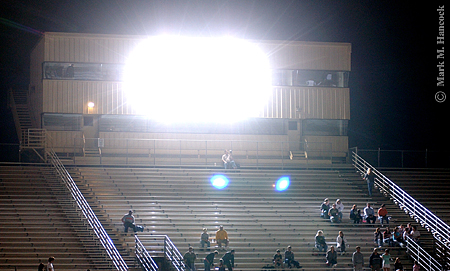
© Mark M. Hancock and The Dallas Morning News
"The Beast" fires from the press box during a soccer game at The Colony High School in The Colony on Tuesday, February 15, 2005. The Colony won the game in a shoot out.
Many folks have asked what kind of lights I use for indoor sports and portraits. I call it "The Beast," but everyone else calls it a Norman P2000D studio flash system (since replaced by the Norman D24R Series 900
 , a 2400WS studio flash system with built-in Pocket Wizard reciever).
Technically, it's incorrect to call a studio flash system a "strobe." I do so for brevity and to distinguish between a hand-held flash/speedlight and a studio flash system. Therefore, when talking outside the PJ world, it's accurate to call a studio flash system as such and a hand-held flash as such, but inside our little world it's fine to say flash and strobe.
My plan was to have everyone understand lighting, guide numbers and all, but more readers were interested in the biz side. So, I caved to reader pressure. Consequently, if you don't understand what follows, I'll clear it up in the next month or so.
For the shots above and below, I used two heads and set the power for 800 Watt Seconds (WS) instead of 1200WS to avoid frightening people or getting in trouble with game officials. Incidentally, it has a single combined-output plug for 2000WS output with a suggested guide number of 168. I don't use it. It's spooky.
In Texas, the standard rule is flash must be above the 13th row of gym bleachers during sanctioned high school games. I place mine on the top row unless it's a really large coliseum.
For hoops, I typically use one head at 800WS bounced off a neutral wall or ceiling. For hockey, I either bounce it off the wall behind the penalty box or I use two heads and bounce them off the wall toward the ceiling and onto the ice (basically over the stands). For volleyball, I use one head set at 400WS with a softbox.
Last month I had a soccer assignment without a tight deadline, so I lit it. I wouldn't suggest this for most people, but it turned out OK. It fell into the "must try" category since it supposedly can't or shouldn't be done. It would've really rocked if the game was more violent. I could see it being major cool for night track events.
The nice stadium officials let me put my strobes on the filming deck of the press box at a standard high school stadium. With all these variables mentioned above, I could have gotten f/4 at 1/500 on the field at 800iso. I didn't really trust how it looked on the LCD, so I chose a setting on the safe side (f/2.8 at 1/250th). In retrospect, I wish I had at least increased the speed because the highlights (Zone VII) are still hot and there was a little more ambient light blur than I wanted.
In the end, I learned a few things. I learned it's possible to light an entire playing field from the press box resulting in better light than available. I learned that Pocket Wizards
are good for at least 150 yards, and I learned the strobes at this setting and height can kick out enough light for 150 yards plus tip-in. I suppose I should test the 2000WS one day to get an absolute range on it. Some day, I'll sweet talk my wife into getting me a second power pack and another Pocket Wizard to cross-light events. Imagine the tribal sounds I'll make in the scanning room when I shoot football or light an entire gym at f/22. :-}
I admit the shot below isn't great. I posted it to show the difference between the available light shadows and the strobe shadow (the darkest one). In other words, at much less than full power and at great distance, "The Beast" is still more powerful (for milliseconds) than the banks of lights at most high school stadiums.
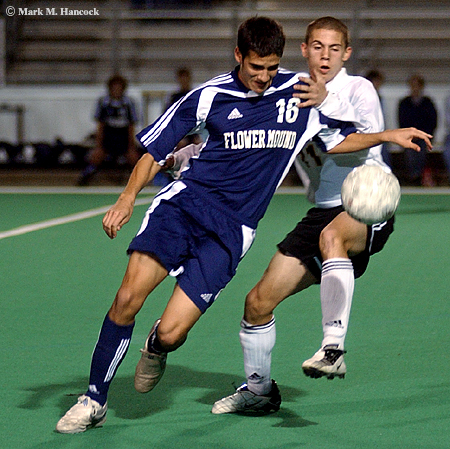
© Mark M. Hancock and The Dallas Morning News
Flower Mound High School's Richard Oliva (No. 16, left) tries to get past The Colony's Jake Oldham (No. 11, right) during a soccer game at The Colony High School in The Colony on Tuesday, February 15, 2005. The Colony won the game in a shoot out.
Enough for now,
Monday, February 28, 2005
Sometimes it's too fast
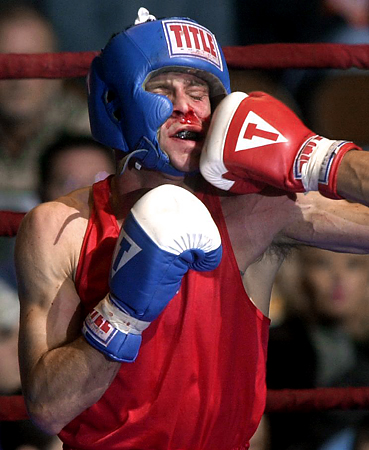
Featherweight open boxer Raul Barrientes (left) takes a shot from Jose Hernandez (red glove right) during the Fort Worth Golden Gloves boxing tournament at the Will Rogers Memorial Center complex on February 23, 2002. Hernandez won the fight.
Mark M. Hancock / © The Dallas Morning News
This is an example of a rare occurrence of my strobes/shutter set too fast. This frame is shot somewhere around f/8 at 1/500 or 1/640. The resulting image looks like the red glove is placed delicately in the frame.
If we look closely, his head is beginning to spin around inside his safety headgear. Had I shot at 1/250 or maybe a little slower to let some available light blur the frame, it would've been more obvious how hard he was hit.
Consequently, sometimes it's important to keep the speed slower than possible. Hockey, boxing and karate look the most strange if there is no touch of motion to give the feel of speed and power. Basketball and volleyball hold up the best at super-high speeds.
Enough for now,
Saturday, November 06, 2004
How to shoot basketball
Instead of scattering example images within the text, please look at the last 20 images labeled basketball. Hit "back" on your browser to return to this page after viewing the examples.
Again, I'll avoid talking about remote strobes. So, we'll assume the game is played in an average-lit gym.
Basketball, like volleyball, will again show a PJ's technical weaknesses. Basketball is a game of speed, strategy, timing and physical action. Advanced teams will misdirect opponents (and PJs). Fast, long glass as well as a fast medium-to-wide angle lens are required as well as a monopod.
Basketball is a medium-contact sport. Bone-crushing images are rare. However, there is some tough physical action and hard hits onto the floor. It's fast, but players slow down while in the air, looking for a pass and during collisions.
At the same time, it's often played in poor light. At least the light is constant (if all the gym lights are working), so set the camera to manual mode metered for ambient light. Do whatever EV changes are required to get at least 1/250 shutter speed (if possible).
The game is played in a standard basketball gymnasium. Refs let PJs stand/sit/crouch along the bold exterior stripe of the basketball court. Some refs prefer to keep the padded wall directly behind the free throw lane (called the "paint") clear to allow players some room to fall. At professional games, this area is often reserved for television cameras as well.
Get the standard safe shots before the game begins.
For simplicity, we only have one local team playing this game. I'll refer to the subject team as "home" and the opponents as "visitors."
For new PJs, editors only want shots with a home-team focus unless otherwise stated (wire piggy-backs). It doesn't matter how great the visitors are, focus on the home team. Better images show both teams' faces, but focus on the home team's eyes first.
Like other contact sports, PJs want to capture conflict between the players of opposing teams. Shots with only the home team could be made during practice. The importance of shooting the game is to show the battle between two teams.
Average
Work shots for publication first. Often these won't be published because they're a stepped-up version of safe shots. Each sport has its own variation of average shots (think a "C" on a college exam). These images might be great, but PJs are merely covering their rumps.
The tip-off
This shot is important and easy, but can be easily ruined. Each game begins with a tip-off. Generally, the tallest player from each team meets with the referee in the court's center circle. The ref throws the ball in the air, the players jump and ball control is immediately established.
To get this shot, PJs move to center court opposite scorekeeper and use a 200mm or other medium telephoto lens. PJs also switch to single-servo or manual focus. From a standing position, focus is placed on one of the two players about to jump. Then recompose the frame so the players' heads are in the frame's lowest portion. This is done to avoid the focus sensor locking on a fan in the stands while the action takes place on the frame's sides. Shoot slightly before the first hand hits the ball.
Get the coach
Switch back to continuous focus and move along the sideline to a point across from the home team's coach. As the game begins, energy levels are high for both teams. From a sitting or kneeling position, get some shots of the coach while s/he shouts instructions to her/his team and reacts to game action.
If the home team loses, these images still show a positive rather than a deflated coach. There's no reason to burn a local high school coach because his team was trounced by last year's national champions or an exhibition team.
Get the players
Always focus on the player's eyes instead of the ball. Each team has only five players on the court. There are, at most, 20 players on the whole team. They switch around a lot, but there's no excuse to miss a single player. These images can be used throughout the season if a player does something significant on or off the court.
Use a 200mm or 300mm lens from a sitting or kneeling position (because they tend to lean down). Get a tight shot of each player's face and shoulders – preferably with some action or emotion.
Stay on the sideline to shoot defenders as they face outward from the basket. Also get players as they bring the ball into play after being scored upon. Make sure to shoot from both sidecourts to get all the players.
Work free throws
After a foul, there's a free throw. The safest shot is of the free thrower (hopefully a home-team player). While standing under the goal (or to the side of the paint lines), use a long lens to shoot the player while s/he lines up the shot. The ball is chest high and the player looks up toward the lights. This allows a tight record shot with some tension. It has the ball, a clean background, better light and no armpits (a big problem in basketball).
When the home team defends, move outside the paint zone. Get low and shoot across the paint as the defenders initially block and then rebound after the final free throw.
Work passes
As the offense moves across center court, they tend to pass around the field goal (3-point) line. PJs position themselves near the corner to get these passes as they come toward the PJ. Because the ball moves toward the PJ and the passer is stationary, these are typically sharper images with less blur inside poorly-lit gyms.
A caution: not all basketball players catch the ball. PJs may get bonked in the lens/head. At least it's not a hockey puck.
Winners get the net
When a team wins important championships, it cuts down a net for its trophy case. PJs spot (or hide) an empty chair or ladder to get higher than the crowd (also see some of the advanced techniques for this shot). This allows PJs to get players cutting with the crowd in the background.
This "ceremony" may last a few seconds or be drawn out with each player cutting an individual cord and the coach making the final cut. If it's the latter, make sure to get each important player for future use, but the coach will be the critical image for today's paper.
Good:
Now it becomes important to understand the game. Roughly, teams try to get the ball into the opponent's hoop and prevent the opponent from doing the same. Some teams have good "outside shooters," who can make field goals. Other teams power inside for layups or dunks. Each type of team and player requires a different shooting position and lens choice. Quickly assess which is most likely with the home team to get the best shots.
It's important to have the ball in the frame. In both cases, get the ball on players' fingertips to make tighter frames. Capture the frame while players' wrists are strait or bent backward rather than after the ball has left their hands. Players typically put a backspin on the ball and will look – well – let's say the wrist won't look right if shot a millisecond too late. :-)
Additionally, one or two players on each team tend to score the most points. Know if they are right or left handed and how they prefer to approach the net. PJs want the player facing the camera. PJs line up on the hoop from the correct sidecourt. From a standing position, PJs use a long lens to get breakaway layups, dunks and outside shots from the center.
Even if the scorer's sideline is full, the PJ can get these players during the second half when everything is reversed.
Go wide for inside
Move to the baseline where the home team scores. Switch to a 50mm (medium) or wider lens and pan shots with inside plays as the home team tries to get to the hoop.
Unlike most other shots, these can be accomplished by hand-holding the camera from a standing position. Pan with (follow) the player with the ball while the camera is set on continuous focus. Because the lens is wider, exposures can be slower -- particularly in dark gyms.
Focus on the two home-team players nearest to the paint. Their backs are toward the camera but will quickly turn, fight forward to the net or suddenly fade back and shoot. Be ready for either. This often involves some physical play inside and often an attempt to pass around a defender.
Go long for outside
If the team shoots from the outside, use a long lens and be positioned on the baseline near the 3-point line to get a clear shot. These shots tend to be cleaner than most other images because the distance is greatest between the subject and the background. However, still be cautious about background elements.
Overhead
Get some overhead views as well. These images depend on gym design. Some have catwalks (always leave camera vests/bags behind and tape the camera onto your hand with gaffer's tape). Some have observation decks over the basketball hoops (great for net shots). Most only have bleachers.
From the bleachers, align on the basket high enough to see inside the hoop. This shot also tends to be clean if the PJ is high enough. Since players look toward the basket, they also look at the PJ if the PJ is in the right location. Another advantage is this shot includes the players, the ball and the goal. This is the complete package shot – without armpits.
Sideline emotions
On important or evenly-matched games, skip the last point and focus on the home sideline for reactions. Before the game ends, move to the sidecourt and watch the teammates on the bench from a sitting or kneeling position. They'll ride an emotional roller coaster as the final points are scored. At a big game's end, they'll either jump or collapse.
On finals games, be ready to run. The editors (and competition judges) want to see a dejected player in the foreground with the jubilant team celebrating in the background. This means the PJ must circle around the losing players and align the winning team behind them. This lasts about 10 seconds.
Excellent:
These images are high risk. The likelihood of anything useful is minimal, but if it happens, the PJ looks brilliant at the editing desk. These are the “A” grade shots. Again, I stress not to try these until some publishable shots are already accomplished.
Shoot long, crosscourt
Break out the 300mm or 400mm. Sit on the visitor's backline corner. Shoot action at the opposite end of the court – particularly rebounds and reverse dunks. PJs have a camera with a 200mm in their lap to get the return action as well.
A really great shot has a player diving to keep the ball in play. Again, a PJ could shoot 100 games before even seeing this happen – much less catching it on film/CCD.
Get a steal
PJs sit at the center line position on the sidecourt and wait for an intercepted pass or outright steal. There's a split second of emotion on both players faces when this happens. PJs look for this emotional outburst rather than where the ball is located. The ball position looks the same as a standard game shot, the emotion tells the real story.
Shoot horizontal
Let's face it, basketball is a game of tall, skinny folks jumping up and down. As such, it's a vertical game. Most of the safe shots are vertical. This also allows the PJ to keep both eyes open to anticipate plays.
To kick everything up a notch, try to get tight horizontal shots, particularly on or near the floor. This is where the real fights for the ball take place. In tight games, look for one player to seize the ball and motion for a time out to retain ball control.
Remote cameras
Many pro PJs attach a remotely fired camera with a wide angle lens behind the backboard or long glass looking directly down on the hoop to get action as it comes to the net. These must be set up long before the game begins and be secured so thoroughly that it would be the only thing remaining after a major earthquake. Shake it, hit it, pound on the goal. If it moves at all, remove it. No shot is worth injuring the players or fellow PJs under the goal.
Pre-focus the lens slightly below the hoop, attach a Pocket Wizard or an internal FM remote and use it when a big play comes to the net.
An alternate, but less effective, way to accomplish a similar shot is to mount the camera on a monopod with a long plunger, electronic shutter release cord, or use an infrared or FM remote. PJs pre-focus and test the camera angles (with digital cameras and a ball head on the monopod). Then, they place the monopod base on their shoulders and follow action. This approach allows a slightly longer lens (50mm can occasionally work) to get a tighter shot. However, remember the PJ is shooting completely blind and may get nothing.
Other visual variety
Try layering some images. It's hard to accomplish at f/2.8, but it's possible. Shoot through people arms find other foreground objects in the stands or along the sidecourt to add some visual variety. Work murals or flags in the background.
Go into the catwalk with long glass and get super-tight shots as players approach the net. Again, take all safety precautions.
Next, try some of the "cool" things. Try a few panning blurs (slow-rear synch them if you can). Look around for anything reflective for surreal shots. Try a slow-shutter, double-action zoom as they move down the lane.
Outdoor, daylight games (3-on-3 tournaments particularly) allow silhouettes and other options most indoor games don't allow. It's up to the PJ's imagination and technical prowess.
Enough for now,
Tuesday, October 26, 2004
How to shoot fast-track auto races - Part II

Mark M. Hancock / © The Dallas Morning News
David Starr (No. 75, left) holds off Jack Sprague (No. 16, right) during the NASCAR Craftsman Truck Silverado 350K race at the Texas Motor Speedway in Fort Worth on Saturday, October 16, 2004.
In Part I of this post, we went over the logistics of access and pre-race preparation issues. Today we’ll discuss getting the shots. PJs expect to shoot a lot of frames at every assignment. Auto racing requires an even higher take to get solid, publishable images.
Unlike many other sports, the sequence is unpredictable. PJs may get the best shots immediately after the start and not get safe shots until halfway through the race.
Before the race
If PJs have commitments for time and print space (designated open holes), work the area around the speedway. Some racers, fans and sponsors camp on the outskirts of the speedway area or in the infield. There are hundreds of potential features and photo stories available in the camping areas.
If a team of PJs are covering the event, consider juxtaposing team owners at near-by luxury hotels with camping fans. What are the differences and similarities?
Work the parking lot for tailgate party images. These tend to be colorful and flamboyant. Try to work the speedway into the background to give the images a sense of place.
Immediately surrounding the speedway’s front gates is something similar to a race carnival. Sponsors and vendors transform semi-trailers into everything from take-away restaurants to interactive, state-of-the-art race simulators. These displays are extremely colorful and get the fans fired-up for the main event as well as creating brand loyalty. Within a few hours of the final race’s finish, they are packed up and gone. There are several visual possibilities here as well – particularly if coordinated with the Business section reporters.
PJs with pit access work the teams and crews for “down time” images. The motor crews work hard, but they also play hard and enjoy extreme sports. Look for drivers doing something unrelated to racing (cuddling children, skateboarding, playing with toys, etc...).
The pole
The “scoreboard” in an auto race is the infield pole. The pole has typical lighted numbers like other scoreboards, but it is read from top to bottom. The top number is the lap number. The name of most races includes the total number of laps. However, check to get the correct number of laps (as opposed to miles or kilometers) before the race begins. Knowing the lap number is critical as the finish of the race approaches.
Next, vehicle numbers are displayed in order from 1st to 20th down the pole. At the bottom of the pole are the lap times of the two lead vehicles.
PJs can watch the pole for changes as well as estimating if the second vehicle is about to make a move on the lead vehicle (because the lap time might be slightly higher).
Get the safe shots
Again, the safe shots aren’t sequential. Safe shots are determined by the number of starting racers in any particular race. Visual opportunity, stress (of missing “the” shot) and danger increases as the number of racers increase. Meanwhile, the number of safe shots decreases because of the previous statement. I’ll describe the absolute safest route, but scale back as the field size increases.
There is no anticipating who’ll wreck or win from the start to the finish. The absolute safe shots begin before the race. Get shots of each car (preferably with its driver) before the race begins. This lets PJs know the paint colors and patterns of each car for IDs later. At a high 45-degree angle, PJs can capture the front, top and side markings of each vehicle. It’s enough to confirm the difference between each car. The cars are displayed before each race and this allows PJs to run down the line to document each car (as well as its pole position).
Introductions
Before each race, drivers are introduced and make a quick statement to the fans. Avoid "talking head at microphone" shots and work the line of drivers waiting for introductions. This gives PJs a chance to get quick mug shots or features of the racers interacting while they aren’t wearing helmets.
Watch the flags
Above the start/finish line is a flag stand. The person in this stand determines the status of the race by waiving different colored flags. It’s safe to get an image of this person waiving each color flag. We don’t know what controversies are brewing in the pits or owners’ boxes, but the flags will often be able to represent a problem.
Flag meanings:
Green flag = start (both initial start and restart)
Yellow flag = caution (wreck or debris on track)
Red flag = full stop (wreck on track / emergency situation)
White flag = one lap left
Checkered flag = finish line
Furled flag = final lap before an action (often a furled green flag before a restart)
Caution flags
After a wreck, the vehicles bunch together and move relatively slowly behind the pace car while the wreck is cleared. This is a chance to get tight shots of one to three cars per frame. If something horrible happens to one of the remaining cars, the PJ can use these images to represent the story (because the wreck was on the opposite side of the track behind a wall or some time later in a different city).
Recovered vehicles
Vehicle recovery isn’t like on the highways. The wrecker attaches a hook to the top of the disabled vehicle, lifts and off it goes to the infield. It happens within a few minutes. Because there might be some additional story about why the vehicle wrecked or had a mechanical problem, take one or two loose shots of the recovery vehicle with the car attached.
Winner’s celebration
After the finish of each NASCAR race, the winner burns some donuts near the finish line. Both the roof and infield shooters should expect and document this.
Next, there will be a standard trophy/check presentation with obligatory champagne, juice, soda or milk splashing. This is typically handled by the infield PJs because there’s not enough time for roof shooters to get the finish and make it to the infield before this is a done deal.
These images add a genuinely happy human face to a story about machines. Frequently, these images get better play than actual race images. So, although they're listed as "safe shots," they’re also required.
Luckily for PJs, the racers have seen/participated in enough of these celebrations to know how to make a good show for PJs. They play the scene like most experienced rock stars and give PJs different visual and layout options. Think of it as an elaborate touchdown dance.
What’s important?
Since the difference between vehicles is slight, the winner of a race is all about the driver and pit stops.
Drivers
Drivers are judged by their aggression to the front. The most successful drivers take calculated risks and expect less-aggressive drivers to back away. It’s a millimeter game of chicken. If neither backs down, a wreck can happen and neither wins.
A driver’s aggression is visually represented by passing. A good driver takes the prime course through a track and tries to pass on the straitaways. An aggressive driver tries to pass in the turns as well (either high or low on the track). The most aggressive drivers will try to force a three-car pass (normally low on the track) and hope the other two realize the danger and back down.
Believe it or not, this may be the most exciting event of the whole race, so the PJ better get it. When all three drivers are superior, the PJ may get two or three turns to follow this battle. If any one of the three has a temporary lapse of reason, everyone goes into a wall, and the PJ is already on it.

Mark M. Hancock / © The Dallas Morning News
Crew members work on Dennis Setzer's truck during the NASCAR Craftsman Truck Silverado 350K race at the Texas Motor Speedway in Fort Worth on Saturday, October 16, 2004.
Pit stops
The machines are basically traveling from Dallas to Little Rock (New York to Virginia / Italy to Poland) in about an hour and a half. This requires lots of fuel, new tires and other repairs. Since each fraction of a second is important, all fueling, tire changes and repairs must be done simultaneously in a matter of seconds. This is done by a highly-coordinated pit team.
The team members are well-paid professionals in a potentially deadly area. A fraction of a second is also the difference between a fire and/or a broken leg in the pit. Shoot the activities of these technicians because it’s equally important to getting the win.

Mark M. Hancock / © The Dallas Morning News
Alex Barron's mangled Indy car skids across the infield during the IRL Chevy 500 race at the Texas Motor Speedway in Fort Worth on Sunday, October 17, 2004.
Look for wrecks
As with everything else, I don’t wish a wreck on anyone. I hope all the racers finish. However, most of the time, they won’t. Machines break. Editors and readers expect to see wrecks if they happen. PJs are expected to get these (preferably mid-air with a clean background).
Wrecks can happen anywhere on the track at any time. However, there are some predictable situations to watch. An additional problem is speed. If a car even wiggles, hit the auto-winder because the car will disintegrate faster than the brain can tell the finger to shoot.
Major wrecks occur when vehicles are close together. The likelihood of a wreck is increased in the turns. Each track has one or two turns which are wreck magnets. When all are combined, it’s obvious where to watch.
Bunched vehicles
If a vehicle loses a tire, it will spin and wreck. If it’s surrounded by other cars at the time, they all share the joy. Consequently, major wrecks are most likely at the beginning of the race or at restarts after a yellow-flag caution.
For PJs, it’s like jumping on a bus going 60 mph. The cars move slowly for several laps during the yellow, the green is waived, the cars accelerate and another wreck happens. If PJs aren’t ready, it’s over.
To be ready for an initial wreck, follow the largest groups of vehicles during the majority of the race. This is the most likely place for problems. The leader is the least likely to wreck because s/he normally has more time to react (unless passing the tail at the time). The group directly behind the leader is the most aggressive, so it’s the best place to look.
Similarly, when one vehicle tries to pass another vehicle, they may get very close together and occasionally bump. Get the bump, but if the bump is too hard and either vehicle loses traction, both may go for a tumble.
Turns
Although fast-tracks are banked, vehicles are most likely to lose traction in the turns. If the track gets wet, expect dangerous turns.
Trick turns
No matter how well a track is engineered, each turn or curve has its own character. Typically one turn creates more problems for drivers than others. Knowing which turn is most likely to cause problems is good for PJs.
Research the track’s history and/or ask other PJs or fans which turns create the most problems. Find a position to cover this particular turn and watch it particularly when more than one vehicle tries to take it at the same time.

Mark M. Hancock / © The Dallas Morning News
Chad Blount (No. 2, left) spins out and pushes Denny Hamlin (No. 03, right) into the wall during the NASCAR Craftsman Truck Silverado 350K race at the Texas Motor Speedway in Fort Worth on Saturday, October 16, 2004.
Secondary wrecks
Although PJs may miss the primary wreck, get on it quick because a wreck normally causes secondary wrecks. A damaged car slows down and/or may veer in any direction. Meanwhile, other cars are speeding into the wreck area. This causes additional braking and swerving. Secondary wreck can be caused by both the reaction to the initial wreck or from the original wreck skidding and entering the track again at a different location.
Try something creative
For most of the race, nothing visually significant happens. For PJs running two camera rigs, this allows time for some experimentation. Try some slower exposure pans with the vehicles to blur colorful backgrounds or foregrounds. It’s also interesting to juxtapose still items (people in lawn chairs on motor homes) against the blurring cars on the track.
Some other novel ideas can be silhouettes, nighttime flash synchs, layering speeding vehicles inside interesting foreground elements, reflections, negative space experiments or any number of other gadgets in the PJ toolbox.

Mark M. Hancock / © The Dallas Morning News
Helio Castroneves of Sao Paulo, Brazil takes the checkered flag to win the IRL Chevy 500 race at the Texas Motor Speedway in Fort Worth on Sunday, October 17, 2004.
Get the finish
I can’t overstate the importance of this singular frame (at these speeds, there’s only one frame). The whole day’s shoot (as well as time trials) leads to this one frame. Better have it or quickly catch the next plane to “anywhere.”
Plan for the finish
There are no visual surprises with the finish of a fast-track race. A vehicle (maybe two) crosses a specific line on the track at a specific speed after a specific number of laps. The PJ must be in place, have fresh batteries and disks/film and know what and how to shoot before the white flag lap.
Before the race, find the best position for a clear shot at the finish line. This isn’t normally the best place to shoot the race, so look at it from several angles. PJs want an unobstructed view and a clean background with a clear view of the finish line and, preferably, the checkered flag.
If PJs cover time trials or more than one race, they should practice timing the finish for each type of vehicle. Since every camera has a different shutter lag time, it’s best to know exactly when to shoot to align the vehicles with the finish line. A few test frames on dit cameras is strongly advised.
When the race has 20 laps left, change batteries. When only five laps remain, get in position and change to new disks and/or film. This should eliminate the sinking feeling some experience when the camera won’t fire at the exact moment it MUST. It also makes editing easier on deadline.
Execute the finish
As the race draws to a close, the PJ is in the right place with fresh batteries and disks/film. The PJ also knows the shutter lag time and has a visual shooting mark to compensate for the microsecond delay.
However, this still doesn’t guaranty a decent image. To get a good shot, we go back to the photography basics: exposure, timing and focus. We have already have timing figured out.
Next, during the last lap or two, use one or more alternate means to verify correct exposure. Because the track may be black or near white with a broad white painted line, PJs may need to manually control the exposure for the finish. Additionally, the winning car might be white or black and again give a wrong meter reading. Set the correct exposure for the light falling on the finish line.
The last of the three elements is focus. Autofocus doesn’t mean it can focus on a speeding auto at the right time. Switch to manual focus and prefocus on the finish line with enough depth-of-field to handle the difference between the ground and the top of the driver’s head or vehicle.
Lastly, get it. Look at the pole to spot the correct leader. As the leader comes into view, pan the camera with the car until it hits the shutter lag marker and shoot and wind through a few frames (there could still be a wreck after the finish). Notice how the first shot is actually the only shot expected.
If a PJ expects to get the finish with frames per second, the finish will be missed. The vehicle will speed over the finish line at around 3/8000ths of a second. Even at 6 FPS, this gives a PJ 7,994 chances to fail. I’d rather take the 1-in-3 chance.
By panning on the leader, the PJ ensures the vehicle is the sharpest object in the frame. Otherwise, the car still blurs.
If PJs don’t want to risk as much on 3/8000ths of a second, they can increase their odds by dropping down EV toward a slower shutter speed. This creates more area blur -- not particularly bad if one’s trying to show speed -- and is more forgiving of timing (249 chances of failure at 1/250th vs. 1,999 at 1/2000th).
Enough for now,
Subscribe to:
Posts (Atom)


